How-To: Connect to the Sage wireless network
This article will provide you with the necessary instructions on how to connect your device to the Russell Sage College wireless network.
Table Of Contents
Here's how it's done
Find the section below dedicated to your device type, or use the table of contents above.
Apple computers
This section will cover connecting to Sage's wireless on an Apple Computer. If you own a MacBook Pro or MacBook Air, follow along with this section.
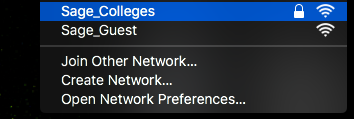
Select the "Russell Sage College" network
click photo to enlarge
Select the "Russell Sage College" from your Wi-Fi menu or from within the System Preferences app.
The wireless settings can be found under the Network section in System Preferences.
Authenticate using your Sage Account
click photo to enlarge
Enter in your Sage username and password. If you've forgotten your password, please review this article.
Verify your connection
click photo to enlarge
You should now be connected to the Russell Sage College wireless.
To verify you are properly connected, check the Status of the wireless network. If it says Connected, then you are all set!
MacOS version 10 and before are not compatible with our Wi-Fi. They will only prompt for a password, instead of username and password.
Windows computers
This section will cover connecting to Sage's wireless from a Windows PC. If you own a Windows laptop, follow along with this section.
Select the "Russell Sage College" network
click photo to enlarge
Enable the "Connect automatically" function
Log into the network with your Sage credentials
Connecting
Google Chromebooks
This section will cover connecting to Sage's wireless on a Chromebook. If you own a Google Chromebook follow along with this section.
Open your network settings
To open your network settings, look for an icon that looks like this:
Connect to the network
Enter the network settings
Wi-Fi Setting | Information to enter |
|---|---|
SSID | Russell Sage College |
EAP method | PEAP |
Phase 2 authentication | MSCHAPv2 |
Server CA certificate | Do not check |
Identity | Your Sage username |
Password | Your Sage password |
|
|
|
|
|
|
Make sure to check off the box next to “Save identity and password”.
Once that is done click Connect and the Chromebook will connect to the Russell Sage College network.
Apple iOS Mobile Devices
This section will cover connecting to Sage's wireless on an Apple Mobile Device. If you own an Apple iPod, iPhone, or iPad, follow along with this section.
Select the "Russell Sage College" network
Authenticate using your Sage Account
Trust Sage's certificate
Verify your connection
Android mobile devices
This section will cover connecting to Sage's wireless on an Android based device. If you own an Android based phone, follow along with this section.
Select the "Russell Sage College" network
Authenticate using your Sage Account
Pixel mobile devices
Wi-Fi Setting | Information to enter |
|---|---|
SSID | Russell Sage College |
EAP method | PEAP |
Phase 2 authentication | MSCHAPv2 |
Server CA certificate | Use system certificates |
Domain | sage.edu |
Identity | Your Sage username |
Password | Your Sage password |
|
|
|
|
Pixel will autofill the identity as Anonymous. THIS MUST BE DELETED TO BE ABLE TO CONNECT.
Wrapping up
This article has shown you how to connect to the Russell Sage College wireless network for your specific device. If you run into any problems, please feel free to reach out to the Service Center!
If you are a not a member of the college (That is, you do not have a Sage username and password) please check out the following Knowledge Base articles for Guest Access.
Related articles


